尋找
探索工具可協助您了解 mesh 網路的連線方式——哪些節點彼此可以收到訊號、訊息所經過的路徑,以及哪裡存在瓶頸或訊號薄弱的連結。
The app offers two complementary approaches:
- Local Mesh Discovery (Scanner) — an automated mode that cycles your connected radio through different LoRa presets, listens on each, and ranks which preset performs best at your location.
- Manual exploration — traceroute, Neighbor Info, and the node list, which you can use at any time to investigate specific paths and topology.
Local Mesh Discovery (Scanner)
Local Mesh Discovery is a dedicated scanning mode that helps you find the best LoRa modem preset for your location and see which nodes are active on each preset. It cycles your connected radio through one or more presets you choose, listens (or “dwells”) on each one for a set time to collect packets, then analyzes and ranks the results.
Open it from Settings → Advanced → Local Mesh Discovery. On desktop, it has its own Settings → Local Mesh Discovery entry.
⚠️ Note: Discovery temporarily changes your radio’s LoRa settings while it scans, then restores your original configuration when it finishes. Your device must be connected to run a scan.
Setting Up a Scan
Before starting, configure these controls:
| Control | 描述說明 |
|---|---|
| LoRa preset picker | Select one or more presets to scan. Discovery dwells on each selected preset in turn. |
| Dwell time | Time to listen on each preset. Choose from 1, 5, 15, 30, 45, 60, 90, 120, or 180 minutes. Longer dwell times collect more packets and give a clearer picture, but take longer. |
| Keep screen awake | Optional toggle that prevents the screen from sleeping during a long scan. |
The Start button stays disabled — with an explanation of why — until the scan can run. Common reasons it’s disabled:
- The device is not connected.
- No presets have been selected to scan.
- The selected preset uses 2.4 GHz, which your hardware doesn’t support.
Live Progress
While a scan runs, Discovery shows its current stage:
| Stage | What’s happening |
|---|---|
| Preparing | Saving your current configuration and getting ready to scan. |
| Shifting to <preset> | Switching the radio to the next preset to test. |
| Reconnecting | Re-establishing the connection after the preset change. |
| Dwell | Listening on the current preset to collect packets, with a countdown to the next step. |
| Analysis | Processing the collected packets and ranking the presets. |
| Restoring | Putting your original LoRa configuration back. |

解讀結果
When the scan completes, Discovery presents a per-preset result card for each preset it tested, plus an overall summary.
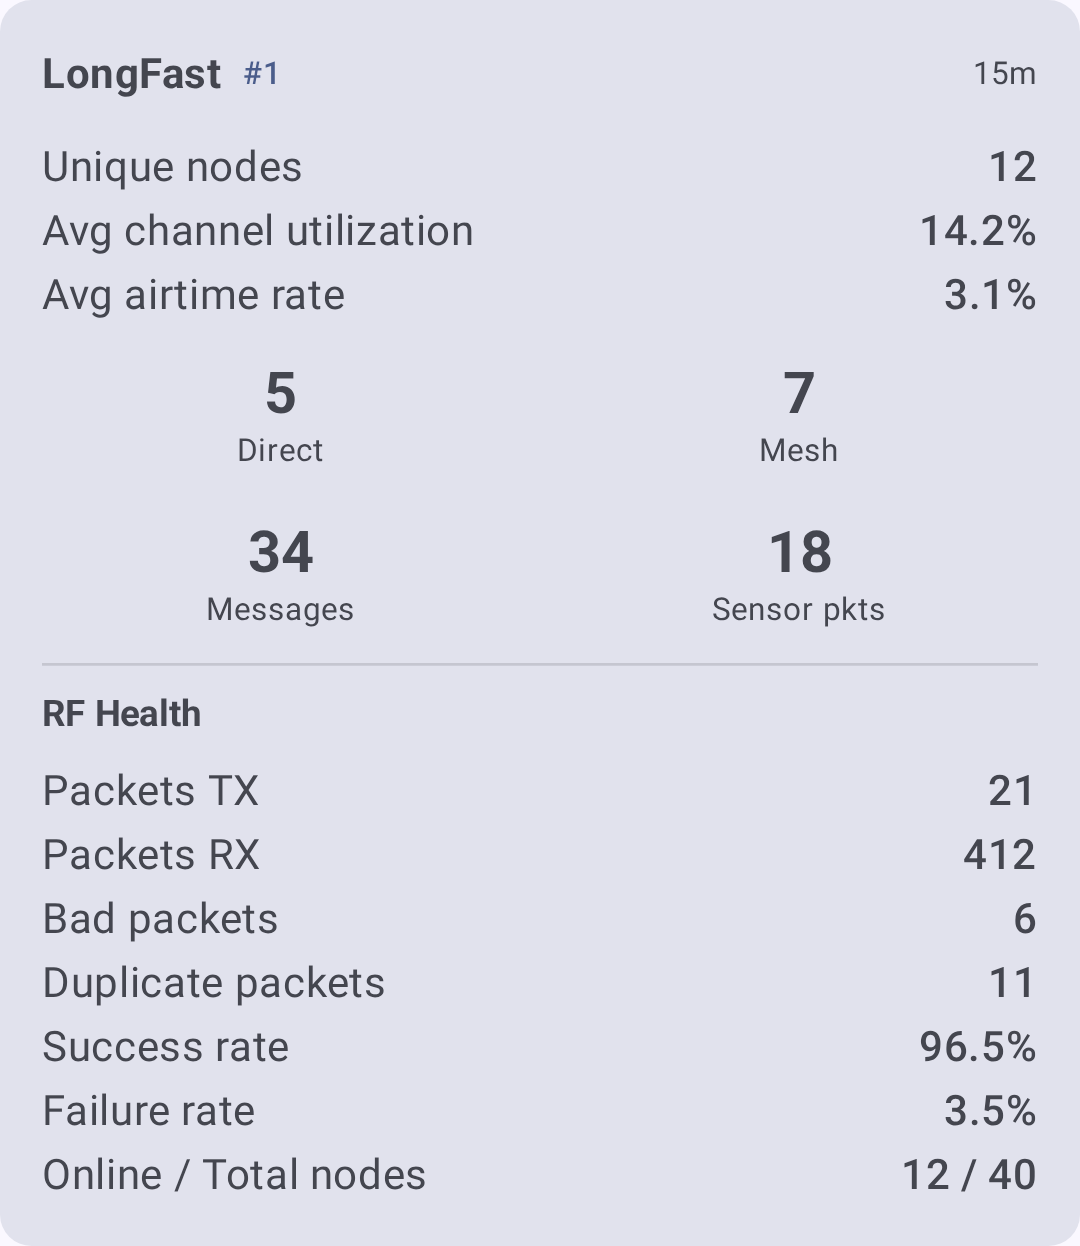
Metrics include:
| 公制(公里/公尺) | What it tells you |
|---|---|
| RF health | Overall quality of the radio environment on that preset. |
| 頻道使用率 | How busy the airwaves were during the dwell. |
| Airtime | Transmission time observed. |
| Direct vs. relayed nodes | How many mesh nodes were heard directly versus via a relay. |
| Bad / duplicate packets | Counts of corrupt and repeated packets, indicating congestion or interference. |
Additional features available from the results:
- Scan History — saved sessions you can revisit; view or delete past scans.
- Discovery Map — a map of the nodes found during the scan.
- Report export — export a report as a PDF on Android, or as text on other platforms.
💡 Tip: On Android, Discovery can generate an on-device AI summary (Gemini Nano) of your results. If the on-device model isn’t available, an algorithmic summary is used instead — so you always get a readable interpretation of the scan.
Mesh Beacon
Mesh Beacon lets nodes invite others to join their mesh. A beaconing node periodically broadcasts an invitation — optionally advertising a channel, region, and modem preset — that nearby devices can hear even before they share a configuration.
Configure it under Settings → Module Config → Mesh Beacon:
- Listen for beacons — receive invitations broadcast by other nodes.
- Broadcast beacon — send your own invitation at a set interval, with an optional message and an offered channel.
Received invitations appear as Mesh invitations cards on the Discovery screen. Each card shows the sender’s message plus the offered channel, region, preset, and signal quality, with these actions:
- Join — switch to the offered channel and preset (retunes the radio and reboots). When the offer matches your current frequency slot, an Add channel action adds it without a reboot.
- Discover — seed a Discovery scan with the offered preset so you can survey that mesh before joining (shown only when the beacon offers a preset).
- Dismiss — ignore the invitation.
Channels advertised by beacons also show up in the scan setup as Beacon channels — select one to include it as a scan target.
Manual Exploration
The tools below are available at any time from the node list and node detail screens. Use them to investigate specific paths and build a topology picture, alongside or instead of a full scan.
路由追蹤
路由追蹤可顯示訊息從您的節點到 mesh 網路上任一節點所經過的確切路徑。 這是診斷連線問題最有效的工具。
執行路由追蹤
- 前往「節點」,並點選您要追蹤的節點。
- 在節點詳細資訊畫面上,點選「路由追蹤」。
- 應用程式將發送路由追蹤請求並等待回應。
- 結果將依序顯示每一個跳躍點,並呈現每個步驟的訊號品質。
解讀結果
路由追蹤結果的顯示方式如下:
你 → 裝置 A (SNR: 8.5, RSSI: -95) → 裝置 B (SNR: 5.2, RSSI: -108) → 目標
每個跳躍點代表一個轉送該訊息的中繼節點。 每個跳躍點的 SNR 與 RSSI 數值可反映該路段的連線品質。
| 判讀重點 | 代表意義 |
|---|---|
| All hops show Good SNR (≥ −7 dB, green) | 路徑狀況良好 — 訊息可穩定傳送 |
| One hop shows Bad SNR (< −15 dB, red) | 訊號薄弱 — 此中繼路段不穩定 |
| 跳躍點過多(4 個以上) | 路徑過長 — 建議調整節點位置以縮短路徑 |
| 重試時走不同路徑 | Mesh 網路正在自動調整 — 存在多條路由(這是好現象!) |
💡 提示:請在幾分鐘內多次執行路由追蹤。 若路徑發生變化,代表您的 mesh 網路具備備援路由 — 這是網路連線良好的象徵。
使用路由追蹤進行疑難排解
- 「找不到路由」— 目標節點可能已離線、超出範圍,或使用不同的頻道。 請確認兩個節點至少共用一個使用相同加密金鑰的頻道。
- 「路由追蹤逾時」— 路徑可能過長(超過跳躍限制),或某中繼節點發生壅塞。 請嘗試在「設定 → LoRa 設定」中提高跳躍限制。
- 非對稱路徑 — 從 A → B 的路由追蹤路徑,可能與 B → A 不同。 這屬於正常現象 — 無線電訊號的傳播並不總是對稱的。
鄰近節點資訊
鄰近節點資訊模組可讓每個節點廣播其可直接收到訊號的節點清單(單跳躍)。 當多個節點共享各自的鄰近節點清單時,您便可拼湊出整個 mesh 網路的拓撲圖。
啟用鄰近節點資訊
- 前往「設定 → 模組設定 → 鄰近節點資訊」。
- 啟用此模組。
- 設定廣播間隔(預設:900 秒 / 15 分鐘)。
啟用後,您的節點將定期廣播其鄰近節點列表。 其他已啟用鄰近節點資訊的節點也會執行相同動作。
檢視鄰近節點資料
- 開啟任一節點的詳細資訊畫面,並尋找「鄰近節點」區段。
- 每筆鄰近節點記錄會顯示可直接收到訊號的節點及其訊號品質。
- 結合多個節點的鄰近節點資料,以了解完整的 mesh 網路拓撲。
⚠️ 注意:鄰近節點資訊會增加無線電佔用時間,因為每個已啟用的節點會定期廣播其鄰近節點清單。 在節點眾多的繁忙 mesh 網路中,建議設定較長的廣播間隔(3600 秒以上)以避免壅塞。
將節點清單作為探索工具
善用節點清單的篩選與排序功能,即可將其作為強大的探索工具。
尋找新節點
- 依「最後收到訊號」排序,可將最近有活動的節點顯示於頂部。
- 啟用「包含未知節點」,可顯示已出現於 mesh 網路但尚未傳送使用者資訊的節點 — 這些通常是剛開機的裝置。
評估連線狀況
- 依「跳躍距離」排序,可區分可直接到達的節點(0 個跳躍點)與需中繼轉送的節點。
- 依「距離」排序,可找出附近的節點並確認是否可到達。
- 使用「排除 MQTT」,可專注於透過無線電(而非網際網路橋接)可到達的節點。
基礎架構稽核
- Disable Exclude infrastructure to see Router, Router Late, and Client Base nodes.
- 檢查其訊號品質與最後收到訊號的時間,以確認基礎架構節點運作正常。
請參閱〔節點〕(nodes) 以了解完整的篩選與排序選項說明。
Mesh 網路探索技巧
- 從路由追蹤開始 — 可立即取得特定路徑的具體可行資訊。
- 在關鍵節點上啟用鄰近節點資訊 — 尤其是路由器與中繼器,以建立骨幹網路的整體概況。
- 查看地圖 —〔地圖〕(map-and-waypoints) 上的節點位置結合訊號資料,有助於了解為何某些連結訊號強,而其他連結訊號弱。
- 比較訊號變化趨勢 — 請參閱〔訊號儀表〕(signal-meter) 指南,以正確解讀 SNR 與 RSSI 數值。